Tuesday, 4 October 2016

AWS Volume tagging based on the block device

                                        AWS Volume tagging based on the block device 

#!/usr/bin/env python2


import boto3
REGION = 'ap-southeast-1'
client = boto3.client('ec2',REGION)


#instanceName=''

response = client.describe_volumes()
#response['Volumes'][0]['Attachments'][0]['VolumeId']
for i in response['Volumes']:
    for j in i['Attachments']:
        print "Volume_Id:"+ j['VolumeId']
        volume_id=j['VolumeId']
        print "Instance_Id:"+j['InstanceId']
        instance_id=j['InstanceId']
        print "Device:"+j['Device']
        device=j['Device']
        response = client.describe_instances(
           InstanceIds=[
               instance_id,
           ],
        )

        #print response
        for i in response['Reservations']:
            temp= i['Instances']
            #print temp
            for j in temp:
                #print j['InstanceId']
                for m in j['Tags']:
                    key=m['Key']
                    if (  key == 'Name' ):
                        print"InstanceName:"+ m['Value']+ "\n"
                        #global instanceName
                        instanceName=m['Value']
                   
                        response = client.create_tags(
                            DryRun=False,
                            Resources=[
                                volume_id,
                            ],
                            Tags=[
                                {
                                    'Key': 'Name',
                                    'Value':instanceName + ":" + device
                                },
                            ]
                        )

Create the Security Group rules using python boto API

                           Create the Security Group rules using python boto API
                                             
#!/usr/bin/env python

import boto3
import boto.ec2

#client = boto3.client('ec2',region_name="ap-southeast-1")
ec2 = boto3.resource('ec2',region_name="ap-southeast-1")
vpc = ec2.Vpc("vpc-a65187c3")
security_group = ec2.SecurityGroup('id')

web1 = vpc.create_security_group(
   DryRun=False,
   GroupName='Apache_5',
   Description='testing',
)
web1.authorize_ingress(IpProtocol="tcp",CidrIp="0.0.0.0/0",FromPort=80,ToPort=80)
web1.authorize_ingress(IpProtocol="tcp",CidrIp="0.0.0.0/0",FromPort=20,ToPort=21)
web1.authorize_ingress(IpProtocol="tcp",CidrIp="0.0.0.0/0",FromPort=443,ToPort=443)
web1.authorize_ingress(IpProtocol="tcp",CidrIp="0.0.0.0/0",FromPort=22,ToPort=22)
#web1.authorize_egress(IpProtocol="tcp",CidrIP="0.0.0.0/0",FromPort=443,ToPort=443)
print web1

conn = boto.ec2.connect_to_region("ap-southeast-1")
SG="Apache_5"
groups = conn.get_all_security_groups(filters={'group-name':[SG]})
for group in groups:
   print group.name
   for rule in group.rules:
       print rule.ip_protocol, rule.from_port, rule.to_port, rule.grants

Create VPN connection using python boto API


                                          Create VPN connection using python boto API

#!/usr/bin/env python2

import boto.vpc
import boto.ec2
import time
#boto.set_stream_logger('boto')

#Connect with AWS region

REGION_NAME = 'ap-southeast-1'

#Connect with your Region
conn = boto.vpc.connect_to_region(REGION_NAME)

#Define your VPC

vpc = 'vpc-a6587c3'

#Create Customer Gateway VPN: ipsec vpn tunnel,Customer Gateway IP,BGP ASN NO,for static please specify BGP ASN=65000 ,Else get the BGP ASN NO. from Customer

cg = conn.create_customer_gateway('ipsec.1', '106.51.254.158', 65534)
print cg.id

#Create Virtual Private

vg = conn.create_vpn_gateway('ipsec.1')
print vg.id

#Attaching VPN Gateway with the VPC

vggateway = vg.attach(vpc)

a = type(vggateway)
print a
print vggateway

# Create VPN connection
vpn = conn.create_vpn_connection('ipsec.1',cg.id,vg.id )
#print vpn

Create AWS VPC using python boto

                                 Create AWS VPC using python boto 


#!/usr/bin/env python2

import boto.vpc
import boto.ec2
import time
REGION_NAME = 'ap-southeast-1'

conn = boto.vpc.connect_to_region(REGION_NAME)

# Create a VPC
vpc = conn.create_vpc('10.0.0.0/16')
print vpc

# Configure the VPC to support DNS resolution and hostname assignment
conn.modify_vpc_attribute(vpc.id, enable_dns_support=True)
conn.modify_vpc_attribute(vpc.id, enable_dns_hostnames=True)

# Create an Internet Gateway
gateway = conn.create_internet_gateway()
print gateway

# Attach the Internet Gateway to our VPC
conn.attach_internet_gateway(gateway.id, vpc.id)

# Create a Route Table
route_table = conn.create_route_table(vpc.id)
route_table1 = conn.create_route_table(vpc.id)

print route_table

# Create Subnet - /24 subnet
subnet1 = conn.create_subnet(vpc.id, '10.0.1.0/24',availability_zone='ap-southeast-1a')
subnet2 = conn.create_subnet(vpc.id, '10.0.2.0/24',availability_zone='ap-southeast-1b')
subnet3 = conn.create_subnet(vpc.id, '10.0.3.0/24',availability_zone='ap-southeast-1a')
subnet4 = conn.create_subnet(vpc.id, '10.0.4.0/24',availability_zone='ap-southeast-1b')
subnet5 = conn.create_subnet(vpc.id, '10.0.5.0/24',availability_zone='ap-southeast-1a')
subnet6 = conn.create_subnet(vpc.id, '10.0.6.0/24',availability_zone='ap-southeast-1b')

print subnet1
print subnet2
print subnet3
print subnet4
print subnet5
print subnet6


# Associate Route Table with our public subnet
route1=conn.associate_route_table(route_table.id, subnet1.id)
route2=conn.associate_route_table(route_table.id, subnet2.id)

print route1
print route2

# Associate Route Table with our private subnet
route3=conn.associate_route_table(route_table1.id, subnet3.id)
route4=conn.associate_route_table(route_table1.id, subnet4.id)
route5=conn.associate_route_table(route_table1.id, subnet5.id)
route6=conn.associate_route_table(route_table1.id, subnet6.id)
print route3
print route4
print route5
print route6

# Create a Route from our Internet Gateway to the internet
route = conn.create_route(route_table.id, '0.0.0.0/0', gateway.id)


print route

Configure Redis Cluster on AWS EC2


             Configure a Redis Cluster on Ubuntu 14.04 


Why Redis : 

Redis is an open source (BSD licensed), in-memory data structure store, used as database, cache and message broker. It supports data structures such as strings, hashes, lists, sets, sorted sets with range queries, bitmaps, hyperloglogs and geospatial indexes with radius queries.

Redis is a NoSQL key-value data store. It can be used as a general purpose cache. keys can be strings, or more complex types (lists, sets, hashes etc).

Prerequisite to configure Redis cluster :

I have used ubuntu 14.04 for my testing .You can use any higher version of ubuntu for your deployment .  

1) Two AWS cloud servers
2) Two Redis Nodes,one master and one slave

Step 1 — Install Redis Master Server

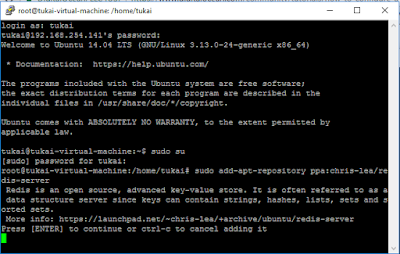
we need to add Chris Lea's Redis repository and perform the ap-get update.Once the repo is added and update process is completed you can install the Radis server. 


Run the following command to update the packages:


Install the Redis server:

Install radis on the master node. 


Follow the same process on the slave node .

Step 2 — Configure Redis Master Server node 

Once redis is installed on the server we need to change few configuration settings on the master node .

Open /etc/redis/redis.conf with your favorite text editor(vim/nano):

#vim /etc/redis/redis.conf

First set a sensible value to the keepalive timer for TCP:
If you want server to be accessible to anyone on the web you need comment out this line  as shown in the above picture:
#bind 127.0.0.1
To protect the Radis from the attacker you must set the password of the radis node .

If you want to take the backup of your radis data you need to uncomment the below lines .


Save your changes .
Restart the Redis service to reload our configuration changes:


Step 3 — Configure Redis Slave node :

Open /etc/redis/redis.conf with your favorite text editor(vim/nano):

#vim /etc/redis/redis.conf


First set a sensible value to the keepalive timer for TCP same as Master node and Make the server accessible to anyone on the web by commenting out the below line :


Set the slave node password to protect it from the unauthorized access: 


we need to Uncomment the masterauth line and provide the password we set up earlier on the master server node: 
                              

Uncomment this line and indicate the IP address where the master server can be reached, followed by the port set on that machine :


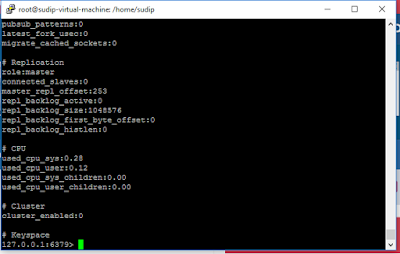
Step 4 — Verify the Master-Slave Replication :

Now authenticate with Redis with the password you set when configuring the master:


Promote Slave as Master Cache node :


Rejoin the Slave node to master after the disaster recovery :


Sunday, 25 September 2016

AWS Autoscaling Windows Instances in the Domain Environment

   Purpose of the Blog:

It’s been more than 4 years I’m working with AWS but still I feel that Autoscaling with Domain environment is a challenge for the Corporate, Especially if you have PCI and Corporate Policy which will not allow you to use AWS directory service or Simple AD serveries as it is not compliance with PCI.

AWS PCI compliance Services:


And every time you go and ask AWS support they will give you nice document how we can achieve this using AWS Directory services or Sample AD. According to them it is the only way to achieve this at this moment.
So I faced lot of issues to designing autoscaling policy for many corporate organization who want to use autoscaling but not ready to sync the corporate AD with sample AD.

I have told few of my client in recent past the only way to autoscale in the domain environment is we have to use AWS Simple AD and they are not happy with my suggestion.

So this time I tried to do some POC before I tell a corporate client again the same things and yes I have an answer, “We can do this without using AWS directory services/Simple AD also”.
I have written the full steps below how you can achieve this in the domain environment.

Prepare your golden AMI:

  • Launch a new windows server instance.
  • Open the group policy management console using “gpedit.msc “ from run. Navigate to the console tree, click Scripts (Startup/Shutdown). The path is Computer Configuration\Windows Settings\Scripts (Startup/Shutdown). Select “PowerShell Script” put the below script and select the option “Run Windows PowerShell script first” and save it.


Sample PowerShell Script:


Set-ExecutionPolicy -ExecutionPolicy RemoteSigned -Force
$newDNSServers = "192.168.152.133","192.168.152.2"
$adapters = Get-WmiObject Win32_NetworkAdapterConfiguration | Where-Object {$_.DNSServerSearchOrder -ne $null}
$adapters | ForEach-Object {$_.SetDNSServerSearchOrder($newDNSServers)}
$domain = "myDomain"
$password = "myPassword!" | ConvertTo-SecureString -asPlainText -Force
$username = "$domain\myUserAccount"
$credential = New-Object System.Management.Automation.PSCredential($username,$password)
Add-Computer –DomainName -  $domain --OUPath "OU=”The OU where you wat to place autoscale servers”,DC=”Domain Prefix” ,DC=”Dommin suffix”  -Credential $credential
shutdown /r /t 90
del C:\Windows\System32\GroupPolicy\Machine\Scripts\Startup\script_name.ps1

The Script I used for my POC:

Set-ExecutionPolicy -ExecutionPolicy RemoteSigned -Force
$newDNSServers = "172.31.0.100 ","172.31.0.2"
$adapters = Get-WmiObject Win32_NetworkAdapterConfiguration | Where-Object {$_.DNSServerSearchOrder -ne $null}
$adapters | ForEach-Object {$_.SetDNSServerSearchOrder($newDNSServers)}
$domain = "aws.local"
$password = "Pass@word1" | ConvertTo-SecureString -asPlainText -Force
$username = "$domain\aws-autoscale"
$credential = New-Object System.Management.Automation.PSCredential($username,$password)
Add-Computer -DomainName $domain -OUPath "OU=aws-autoscale,DC=aws,DC=local" -Credential $credential
shutdown /r /t 90
del C:\Windows\System32\GroupPolicy\Machine\Scripts\Startup\test.ps1

 Note about above PowerShell Script: 
I do not want to hardcode the DNS server IP in the network config so I change the DNS setting by using first four command.
The last line “del” command is very important because you will end up with infinite loop if the script run again after the reboot (you need to reboot the system to reflect the domain level changes for the server).

  •       I have installed IIS for my sample testing to check the autoscaling using ELB.
  •       Once you have configured your webserver settings you need to use “Ec2Config.exe” and shutdown the instance with the process shown below (“Random -Shutdown with sysprep”). 

  •  Wait for some time it will run the sysprep and stop the instance. This step is very important because in windows domain environment each computer should have it’s unique SID value. With the help of “Ec2Config.exe” you can retrieve the password from the AWS console for each instances which will come up during autoscaling.  To know more about windows syspep  please go through the below link
  •  URL:  https://technet.microsoft.com/en-us/library/cc721940(v=ws.10).aspx
  •  Create an AMI of the instance.
         Configure Autoscaling :

          Once the AMI creation is completed configure the autoscaling group. Please refer to the below document for       configuring autoscalling policy.

         Validate instances domain/workgroup profile:
          Login to the instances launched by the autoscaling group and check that whether it is added to the domain or     not.

          Few screenshot from my POC :

  •         Instances are launched from the autoscaling group.


  •      Login to the instances and check that it added to domain or not.


     Test your Sample web application by using ELB URL:                                                                                      

      Check the health of the ELB instances  ( I always prefer to configure http based health check) and  access the web application using the ELB URL.


         Screenshot form my POC:


Health check of the ELB instances launched by an autoscaling group.


Test the web application by using ELB URL.


        Clean up your OU:

      As we are using autoscalling for the domain environment, you can see lots of computer objects still exists in the OU which was already deleted by the autoscaling group termination policy. So it is very important to cleanup those Computer objects .You can use the blow PowerShell script and run it through windows task scheduler cleanup the resources which currently didn’t exist in the domain.

        PowerShell Script:

$then = (Get-Date).AddDays(-15) # The 15 is the number of days from today since the last logon.

        Get-ADComputer -Property Name,lastLogonDate -Filter {lastLogonDate -lt $then} | Remove-ADComputer  # If you would like to Remove these computer accounts


Thanks for visiting my Blog Site.

Sudipta Saha
AWS Solution Architect –Professional Level (AWS-PSA-2596)